About adding a static route to my DOCSIS modem
You may think this is an easy task but let’s find out. One would expect such functionality in a web interface …

… but no, it’s not there. So what’s next? Let’s hack it!
Research
First I checked how the webUI works, how does it send requests for config change, tried to abuse ping to do remote exec but without luck. Later, I’ve found out that there were some vulnerabilities found but they all seemed to be fixed in my FW revision.
But there’s even better source of info about this modem: security evaluation report. It still refers to the outdated firmware but describes some hardware attack vectors.
Internals
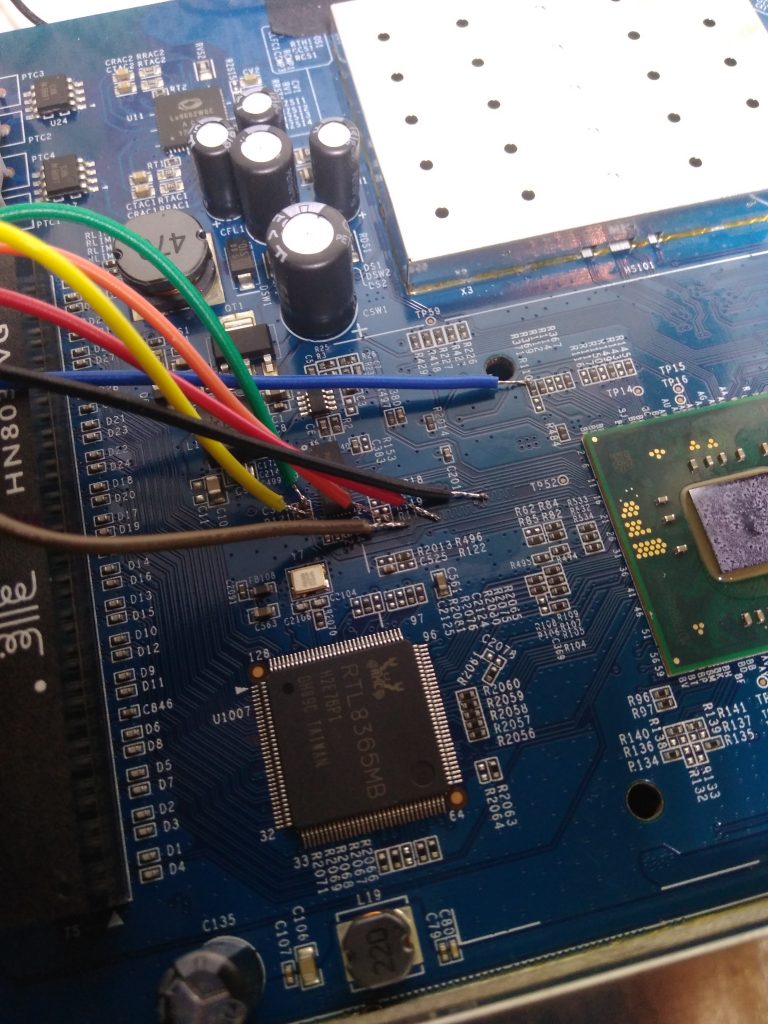
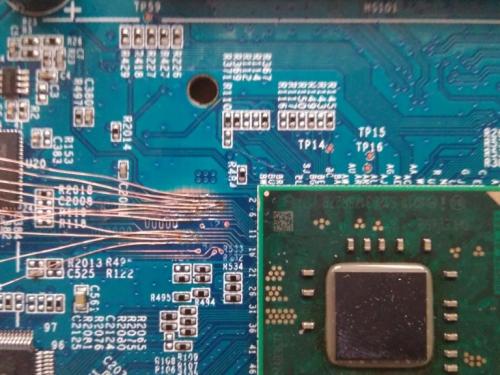
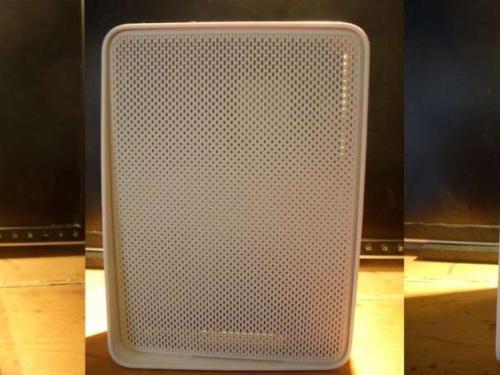
HW hacking can be dangerous so I bought another modem of the same type from eBay and performed following on that one. This is how the device looks from inside (imagine it without those hacked wires):

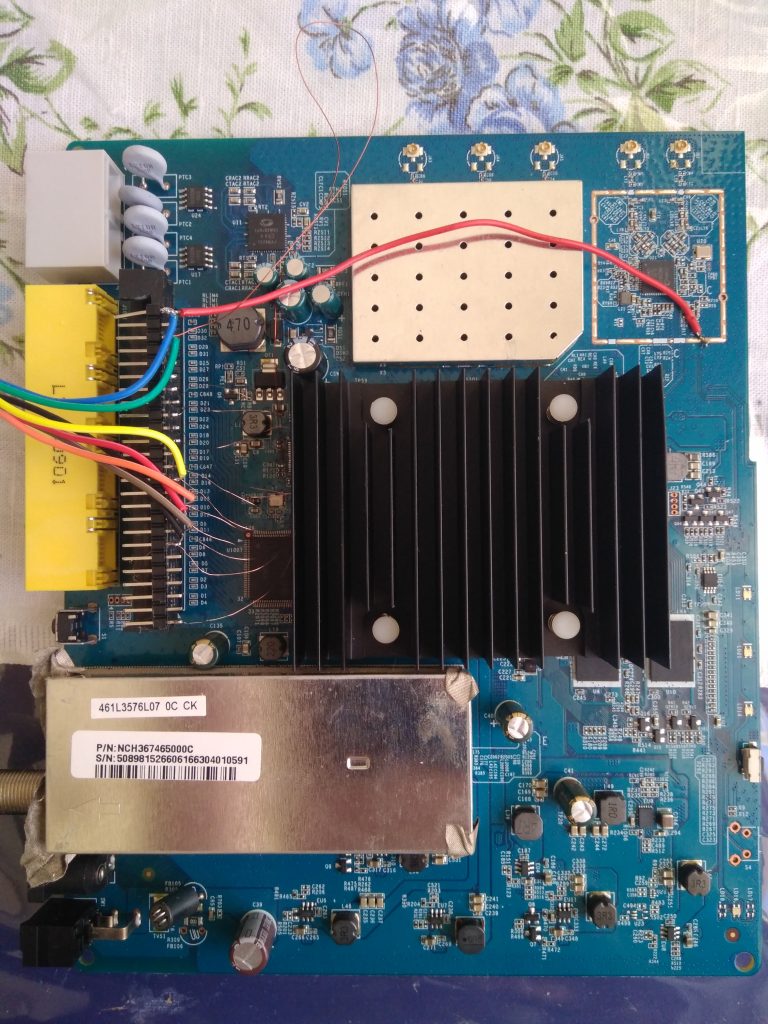

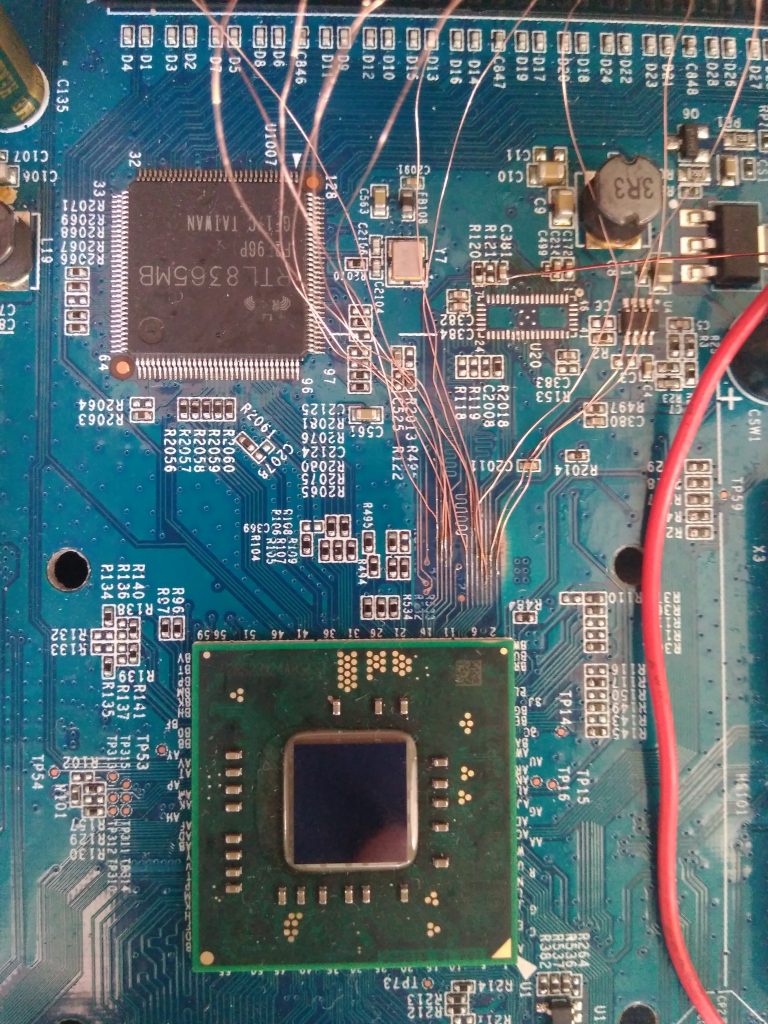

There are two pin headers which provide 115200 baud serial access but they only show a few lines of output (see pictures), they don’t accept any input and on the latest board revision they are not even there.


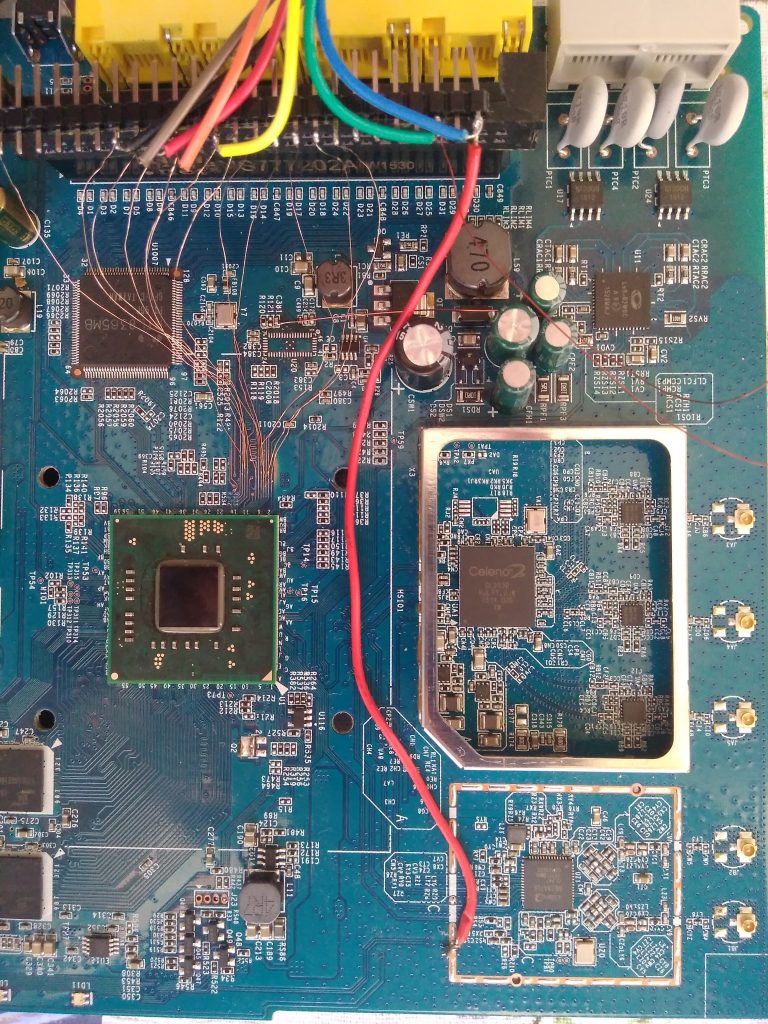
For storage the device uses a NAND flash with an eMMC controller (PS8211-0) – you can see a full description of a similar board together with boot logs at mobile-computer-repairs.co.uk (MCR now on). As my board showed limited boot logs and no way to influence the boot process, I tried (as some forums suggested) to short NAND pins to break the booting. But the only thing I achieved was to brick my test subject so I do not recommend this approach.
Identifying the eMMC pinout
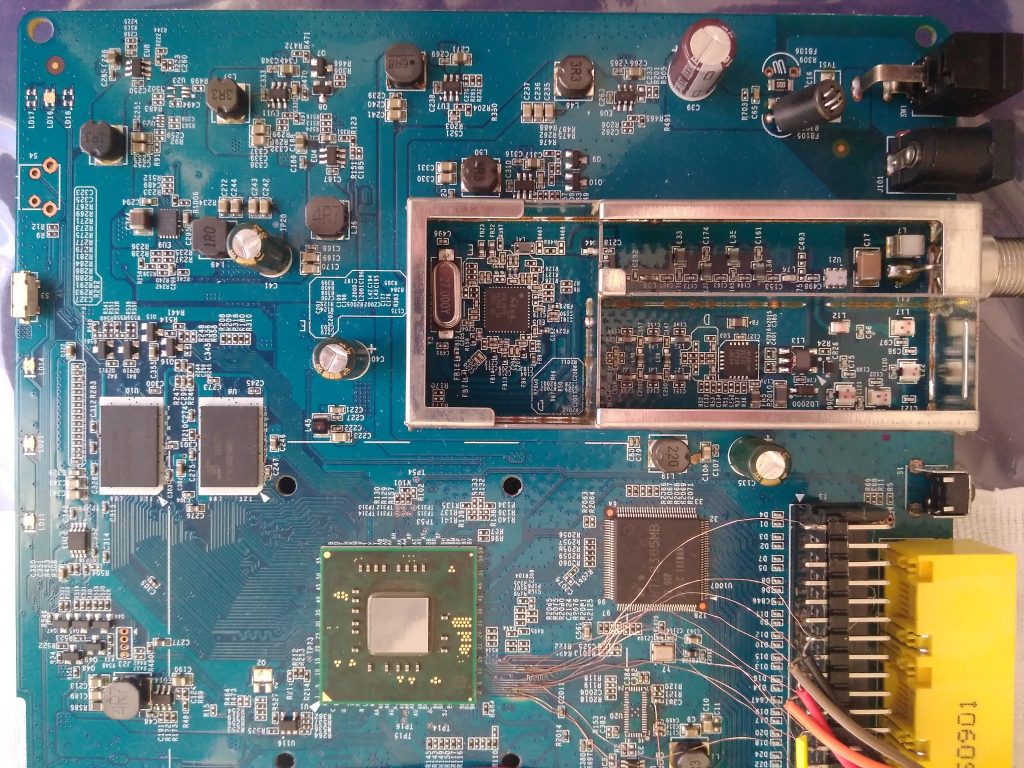
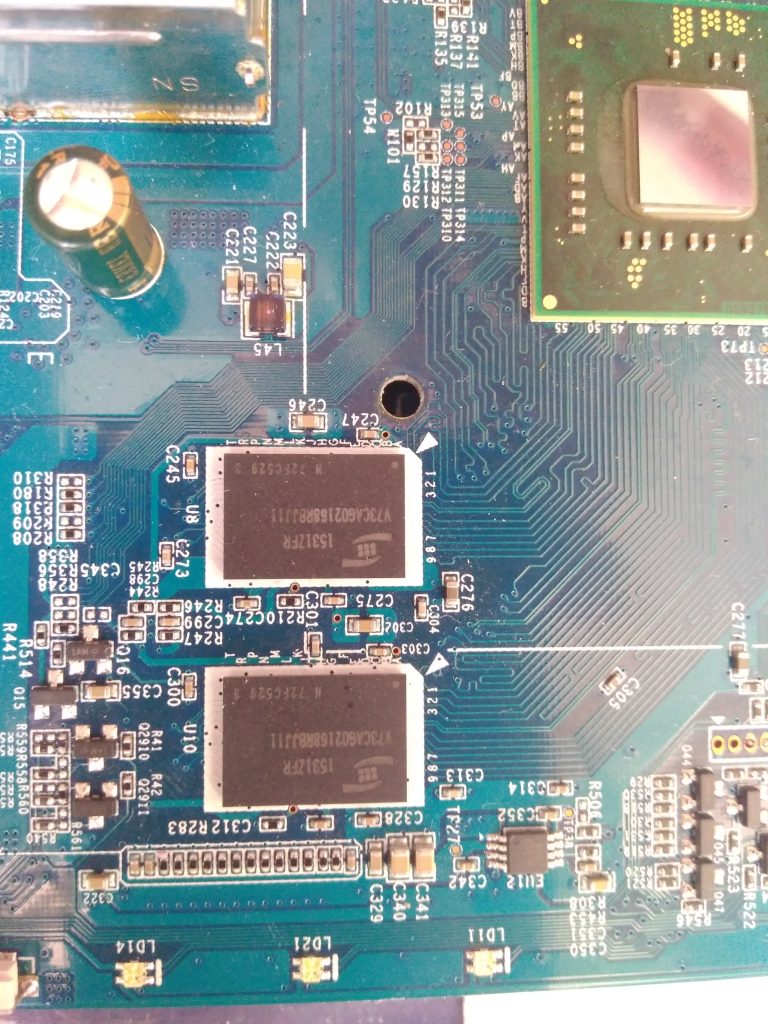
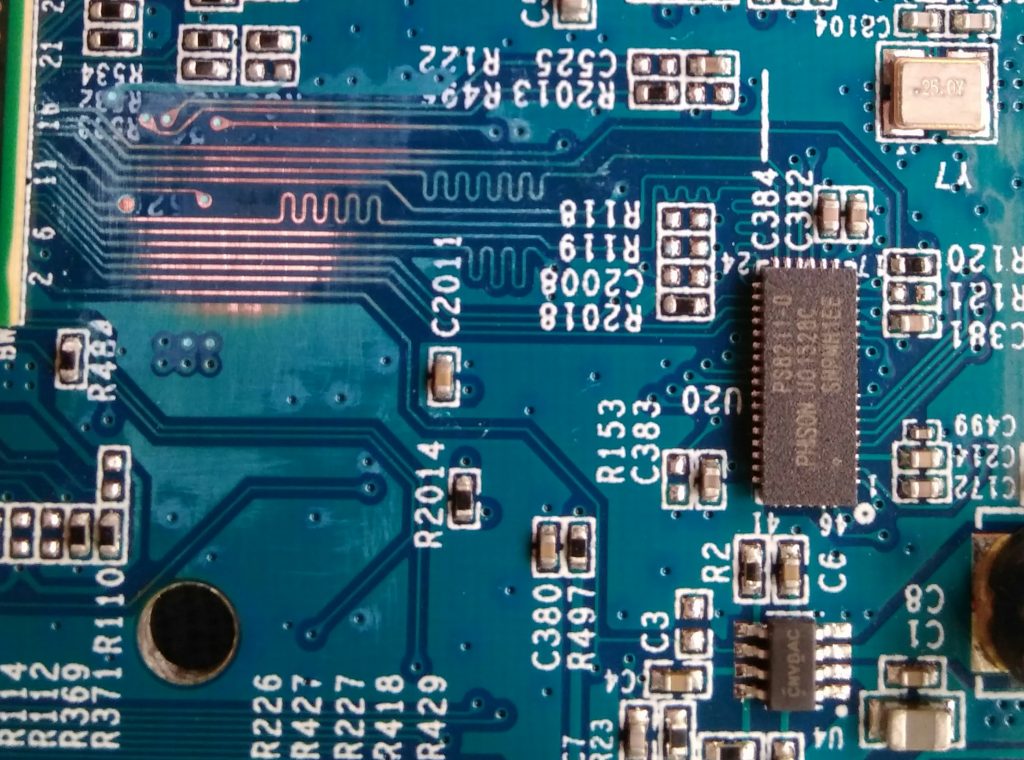
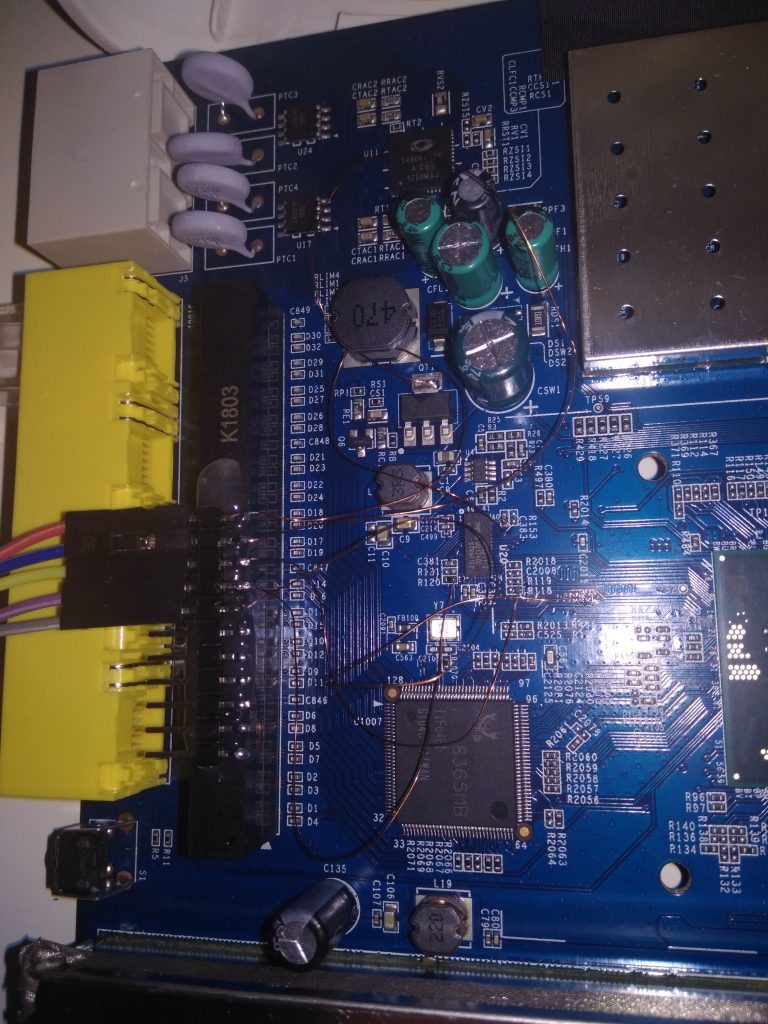
MCR page shows a pinout of the eMMC, so I took an oscilloscope and started to measure signals on pins. This actually yielded conflicting results so I chose a different approach. This is a known technique and you can read about it here. I scraped the solder mask from all the traces between the main CPU and eMMC to get access to the signals:
attached some wires:
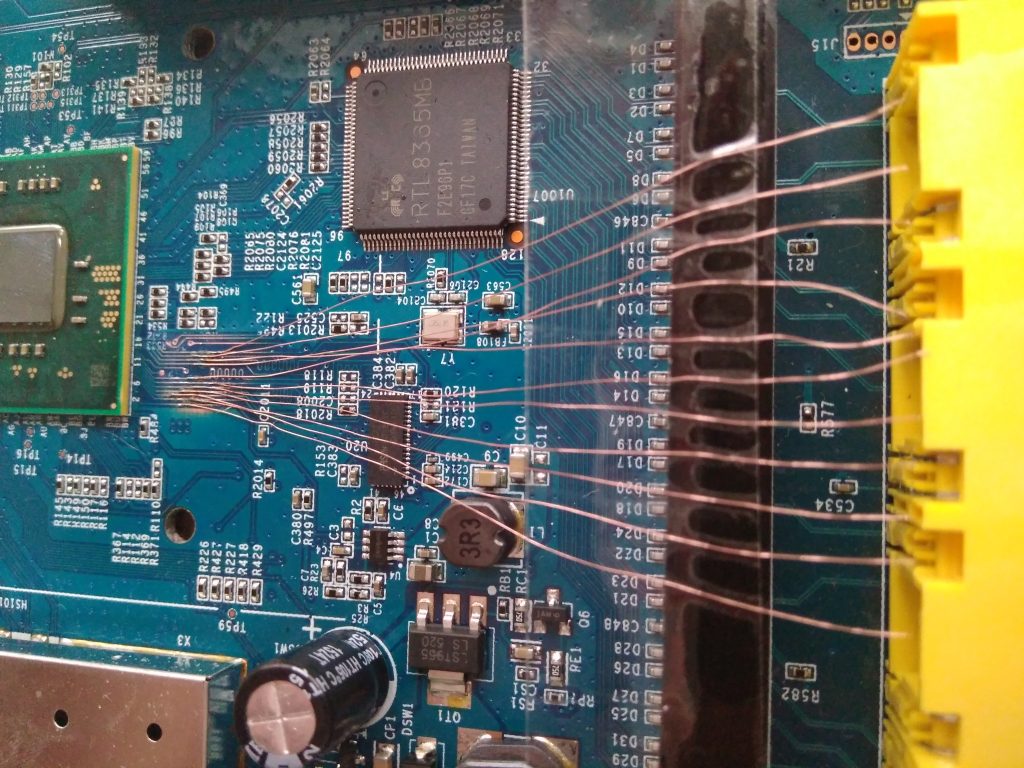
and started to measure signals with my oscilloscope. This immediately revealed CMD and CLK pins and a few DATx pins. For the purpose of reading, I ordered Transcend TS-RDF5 SD card reader which was supposed to handle 1-bit SD mode. The revision I got has GL3233 controller on it and works correctly.
![]()
Unfortunately, there is also one revision with GL3232 which doesn’t work.
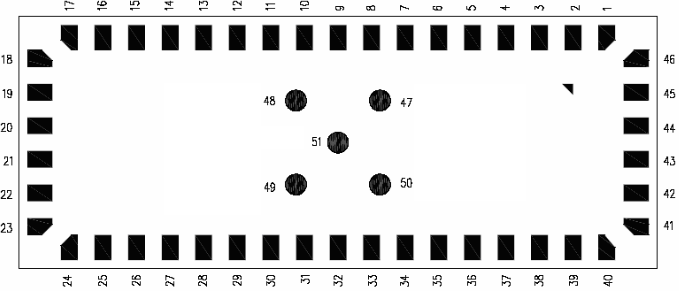
I just guessed the DAT0 pin to be the first one following CMD and it was a lucky guess :). At the end, the pinout looked like this:

Then I traced the lines towards the controller and the resulting controller pinout looks like this:
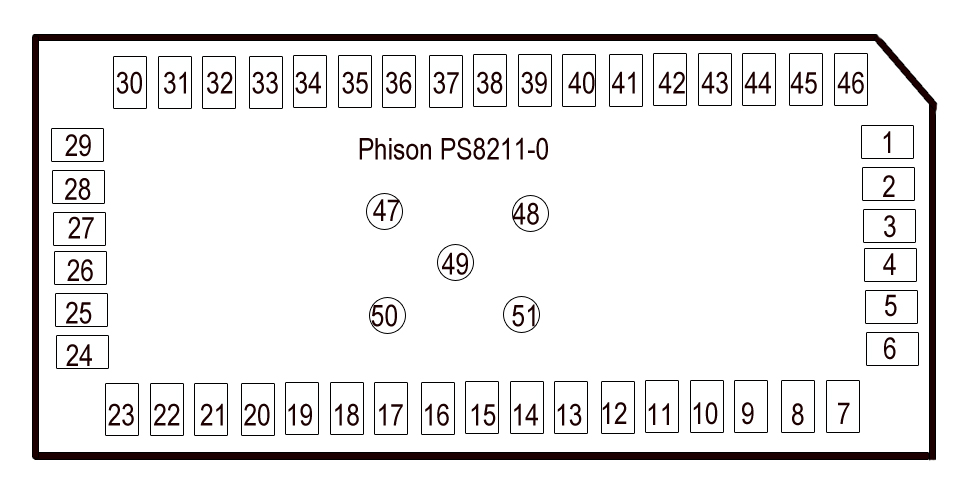
31 – CMD22 – CLK25 – DAT026 – DAT133 – VCC
UPDATE 4.4. 2021: I have found a full schematic of Puma 6 modem here. From this I was able to extract the schematic for PS7000 which seems to be the same as PS8211:
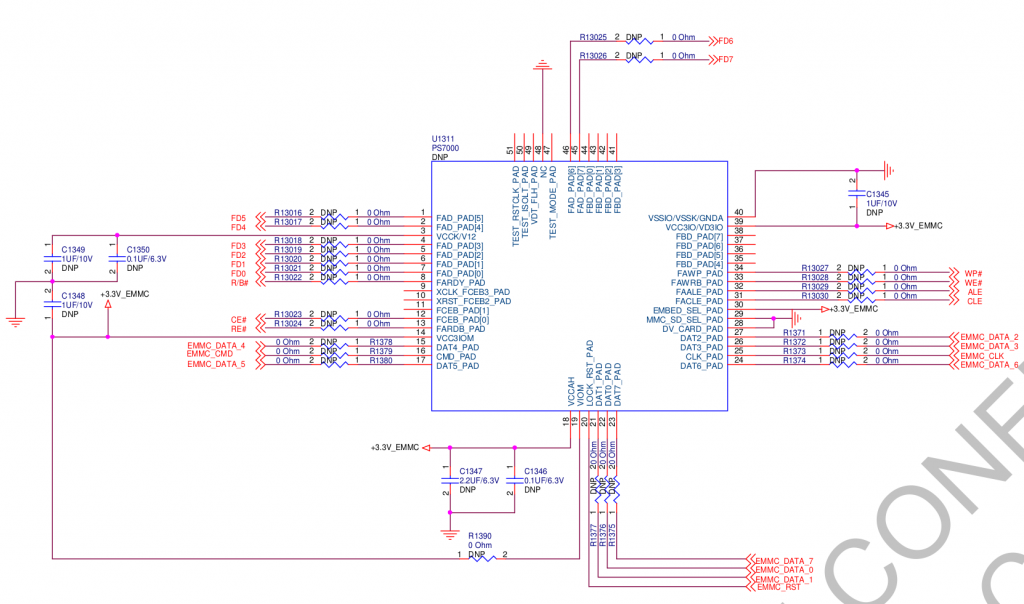
But watch out, it is using a different pin numbering:
After connecting it to the card reader, my PC recognized following:
[352807.254686] usb 2-2: new high-speed USB device number 49 using xhci_hcd
 [352807.406062] usb 2-2: New USB device found, idVendor=8564, idProduct=4000
 [352807.406065] usb 2-2: New USB device strings: Mfr=3, Product=4, SerialNumber=5
 [352807.406067] usb 2-2: Product: Transcend
 [352807.406069] usb 2-2: Manufacturer: TS-RDF5
 [352807.406071] usb 2-2: SerialNumber: 000000000037
 [352807.407058] usb-storage 2-2:1.0: USB Mass Storage device detected
 [352807.410863] scsi host3: usb-storage 2-2:1.0
 [352808.441748] scsi 3:0:0:0: Direct-Access     TS-RDF5  SD  Transcend    TS3A PQ: 0 ANSI: 6
 [352808.442438] sd 3:0:0:0: Attached scsi generic sg2 type 0
 [352808.724617] sd 3:0:0:0: [sdc] 230144 512-byte logical blocks: (118 MB/112 MiB)
 [352808.725399] sd 3:0:0:0: [sdc] Write Protect is off
 [352808.725402] sd 3:0:0:0: [sdc] Mode Sense: 23 00 00 00
 [352808.726262] sd 3:0:0:0: [sdc] Write cache: disabled, read cache: enabled, doesn't support DPO or FUA
 [352808.746880]  sdc: sdc1 sdc2 sdc3 sdc4 < sdc5 sdc6 sdc7 sdc8 sdc9 sdc10 sdc11 sdc12 sdc13 sdc14 sdc15 >
 [352808.750675] sd 3:0:0:0: [sdc] Attached SCSI removable disk
After that I immediately dumped it to a file and started to analyze it.
dd if=/dev/sdc of=upc-sub3.bin bs=1M
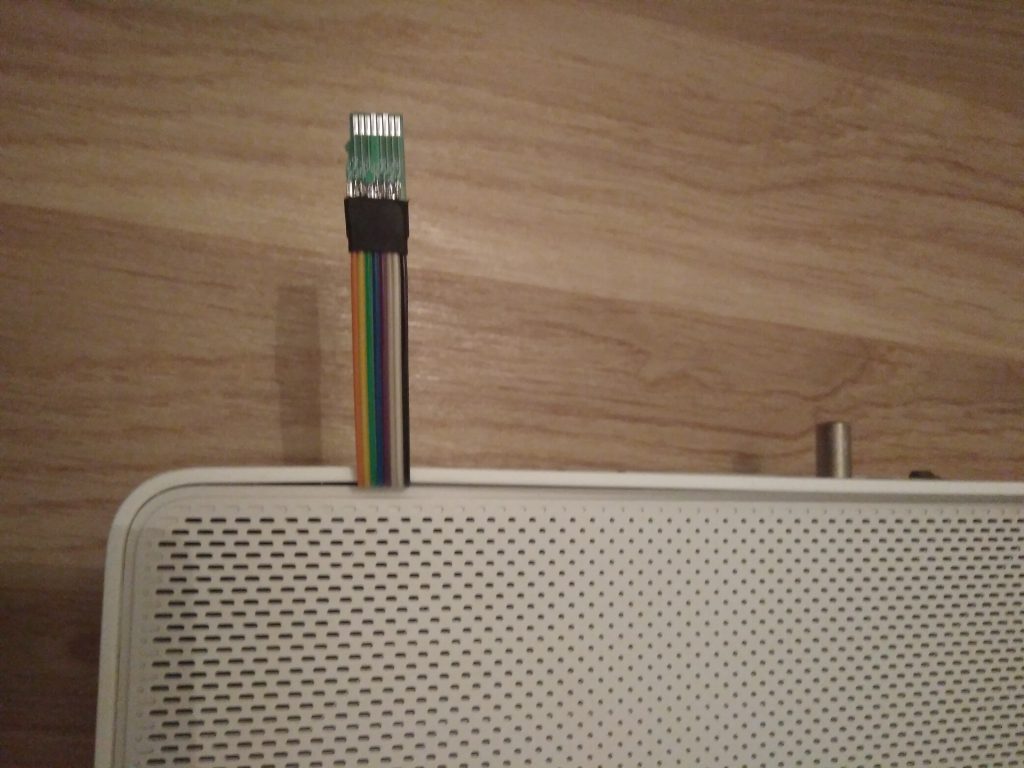
For the connection I used a microSD breakout board which I designed:
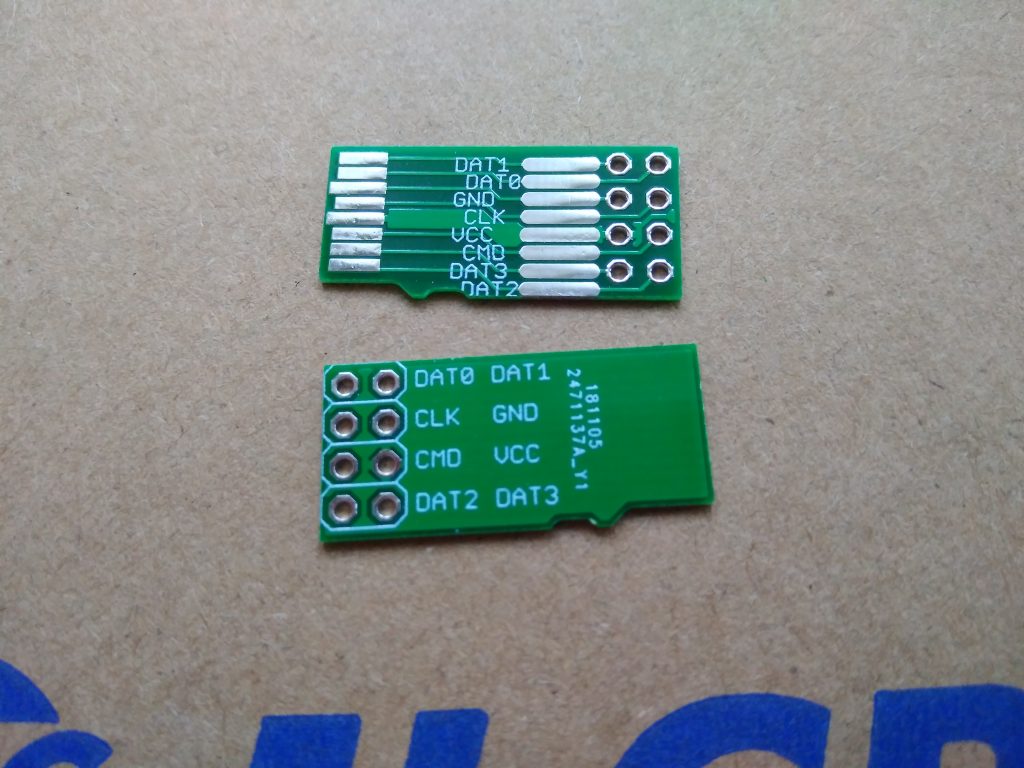
And in later test subjects I also improved the connection setup:
and:
I recommend to use a hot glue for attaching the pin header in order to prevent the thin wires from mechanical stress.
Cloning
As the eMMC is the only nonvolatile storage in the device, I was able to dump my “production” modem (on the picture with colorful wires) with minimal traces of tampering and to copy the whole eMMC dump to my test subject and surprisingly it worked. Later on I’ve added a convenient eMMC breakout cable and started to use to the cloned one for my internet access. If anything goes wrong, I can always flash the working version back without problems.
Flash contents
The eMMC storage is 128MB big and contains partitions. These are actually very useful because they separate multiple kernels and filesystems so we don’t need to explore the whole flash with binwalk.
I created extract.sh which extracts these partitions to separate files so I could easily analyze them and mount them via loop. First, I checked them with filecommand.
- upc-sub3.bin1: Linux kernel x86 boot executable bzImage, version 3.12.17 (jason@alphago) #1 SMP PREEMPT Tue Mar 20 18:56:18 CST 2018, RO-rootFS, swap_dev 0x3, Normal VGA
- upc-sub3.bin2: Linux kernel x86 boot executable bzImage, version 2.6.39 (root@ftd-sw) #2 SMP PREEMPT Wed Apr 5 11:58:12 CST 2017, RO-rootFS, root_dev 0x801, swap_dev 0x3, Normal VGA
- upc-sub3.bin3: Squashfs filesystem, little endian, version 4.0, 13826280 bytes, 2277 inodes, blocksize: 65536 bytes, created: Tue Mar 20 11:14:38 2018
- upc-sub3.bin4: DOS/MBR boot sector; partition 1 : ID=0x83, start-CHS (0x36c,0,1), end-CHS (0x3ff,3,16), startsector 256, 34816 sectors; partition 2 : ID=0x5, start-CHS (0x3ff,3,16), end-CHS (0x3ff,3,16), startsector 35312, 4112 sectors, extended partition table
- upc-sub3.bin5: Squashfs filesystem, little endian, version 4.0, 14369432 bytes, 1377 inodes, blocksize: 65536 bytes, created: Wed Apr 5 04:39:44 2017
- upc-sub3.bin6: Linux rev 1.0 ext3 filesystem data, UUID=10ac6b3f-779b-4b07-af20-6141776df879 (needs journal recovery)
- upc-sub3.bin7: data
- upc-sub3.bin8: u-boot legacy uImage, Boot Script File, Linux/PowerPC, Script File (Not compressed), 8912 bytes, Tue Mar 20 11:26:12 2018, Load Address: 0x00000000, Entry Point: 0x00000000, Header CRC: 0xFF8DF93B, Data CRC: 0xC4A18791
- upc-sub3.bin9: u-boot legacy uImage, Boot Script File, Linux/PowerPC, Script File (Not compressed), 8912 bytes, Wed Apr 5 05:33:39 2017, Load Address: 0x00000000, Entry Point: 0x00000000, Header CRC: 0xADC57663, Data CRC: 0xC4A18791
- upc-sub3.bin10: Linux rev 1.0 ext3 filesystem data, UUID=3df5f8ad-bede-492f-9825-22605d50313c (needs journal recovery)
- upc-sub3.bin11: Linux rev 1.0 ext3 filesystem data, UUID=3df5f8ad-bede-492f-9825-22605d50313c (needs journal recovery)
- upc-sub3.bin12: Squashfs filesystem, little endian, version 4.0, 7994036 bytes, 731 inodes, blocksize: 131072 bytes, created: Tue Mar 20 11:26:09 2018
- upc-sub3.bin13: Squashfs filesystem, little endian, version 4.0, 8068210 bytes, 706 inodes, blocksize: 131072 bytes, created: Wed Apr 5 05:33:36 2017
- upc-sub3.bin14: Squashfs filesystem, little endian, version 4.0, 6108687 bytes, 666 inodes, blocksize: 131072 bytes, created: Tue Mar 20 11:26:11 2018
- upc-sub3.bin15: Squashfs filesystem, little endian, version 4.0, 5493347 bytes, 602 inodes, blocksize: 131072 bytes, created: Wed Apr 5 05:33:39 2017
The mentioned security report says, that the main SoC consists of two separate CPU cores/systems: x86 and ARMv6. Also the content of partitions suggested this. I was mounting and exploring all mountable partitions to get more info about the system.
BPI/SEC Certificates
The certificates which are used for BPI/SEC are stored in partition 10:
# ls -la /nvram/1/security/
 lrwxrwxrwx    1        29 cm_cert.cer -> download/cbn_cm_euro_cert.cer
 lrwxrwxrwx    1        32 cm_key_prv.bin -> download/cbn_cm_euro_privkey.bin
 lrwxrwxrwx    1        41 mfg_key_pub.bin -> /etc/docsis/security/euro_mfg_key_pub.bin
 drwxr-xr-x    2      1024 download
 lrwxrwxrwx    1        38 mfg_cert.cer -> /etc/docsis/security/euro_mfg_cert.cer
 drwxr-xr-x    5      1024 ..
 lrwxrwxrwx    1        42 root_pub_key.bin -> /etc/docsis/security/euro_root_pub_key.bin
 drwxr-xr-x    3      1024 .
$ openssl x509 -in cbn_cm_euro_cert.cer -inform der --noout -text
Certificate:
     Data:
         Version: 3 (0x2)
         Serial Number: 343337499263393 (0x138437dae81a1)
         Signature Algorithm: sha1WithRSAEncryption
         Issuer: C = TW, O = Compal Broadband Networks, OU = Euro-DOCSIS, CN = Compal Broadband Networks Cable Modem Root Certificate Authority
         Validity
             Not Before: Mar 26 19:31:05 2018 GMT
             Not After : Mar 26 19:31:05 2038 GMT
         Subject: C = TW, O = Compal Broadband Networks, OU = Euro-DOCSIS, CN = 38:43:7D:AE:81:A1
         Subject Public Key Info:
             Public Key Algorithm: rsaEncryption
                 RSA Public-Key: (1024 bit)
                 Modulus:
                     00:b8:1b:65:03:78:0c:eb:b8:67:cc:14:a5:36:1d:
                     43:5a:ab:c3:48:8d:2c:79:05:74:5d:8c:b6:44:8c:
                     1e:1e:6c:b7:fa:b0:7d:cb:ce:7f:aa:b1:64:05:49:
                     31:c7:61:f3:73:56:f9:06:75:04:57:59:6f:f6:b8:
                     96:9a:17:21:59:68:1b:4b:8d:cb:bc:d3:dc:43:09:
                     6e:45:4b:03:2e:47:75:4a:b1:75:5f:6f:1e:75:9b:
                     6b:c4:04:f9:70:9a:16:d1:96:8c:d8:9b:92:d6:d0:
                     9f:33:f9:74:ca:21:ac:f7:1c:9e:a8:53:69:49:6b:
                     ab:5d:d5:47:ec:08:10:3c:a3
                 Exponent: 65537 (0x10001)
     Signature Algorithm: sha1WithRSAEncryption
          a0:56:88:ed:c5:d2:eb:0b:b2:31:15:e9:cc:3d:77:60:63:11:
          55:f7:5d:b9:85:ed:a1:d8:b5:56:c7:75:42:b4:ea:55:38:b3:
          f3:3c:39:f7:f4:9e:79:34:b7:8a:53:bd:d3:57:bd:2b:a0:cf:
          a6:80:be:bb:0b:f1:eb:42:71:45:0c:9e:86:b5:9a:bb:a5:06:
          a6:7e:05:bd:e9:4a:dd:7e:46:e2:01:9b:02:52:db:21:7e:b6:
          d7:13:99:7a:d4:f1:ad:c9:91:b1:21:f0:c2:19:fb:e8:8d:10:
          f5:62:4a:50:44:07:61:2e:c3:10:21:7e:58:f8:a9:ac:3e:34:
          f7:40:b6:88:58:bd:f8:c3:3b:47:22:5a:ed:24:0b:b7:60:0b:
          6b:37:bb:84:56:08:46:ae:d9:b3:6d:dc:2b:e8:b5:e3:ef:6a:
          d6:1c:aa:51:f7:61:6a:e4:01:0a:74:29:77:cb:bf:ee:53:7d:
          b7:27:df:ff:46:80:41:fc:00:62:36:4b:3b:ad:35:f8:0d:10:
          80:3a:d1:a0:af:e1:d2:e0:65:47:f8:66:e6:4a:28:90:ff:c5:
          ed:9c:07:b5:7a:1b:60:5f:5f:8f:ae:41:c2:87:d6:bd:60:94:
          80:6d:06:95:62:95:e6:44:d7:d5:76:bf:86:86:69:0b:15:12:
          ae:0b:3e:c6
As you can see below, the key file is no known format because it is encrypted so you cannot use it in any other device.
$ openssl rsa -in cbn_cm_euro_privkey.bin -inform der --noout -text
 unable to load Private Key
 140486965376832:error:0D07207B:asn1 encoding routines:ASN1_get_object:header too long:../crypto/asn1/asn1_lib.c:101:
One of my friends was so kind to provide a decrypting program so after running it, you will get a decrypted key:
$ ./compal-decrypt cbn_cm_euro_privkey.bin cbn_cm_euro_privkey.bin.decrypt
 [+] success!
$ openssl rsa -in cbn_cm_euro_privkey.bin.decrypt -inform der --noout -text

RSA Private-Key: (1024 bit, 2 primes)

...
After porting these certificates to another modem (with cloned MAC) you can use the other device for internet access.
This is of course not my “production” certificate. 🙂
Arbitrary code execution
As a first target I chose the x86 system because I thought it is more important.
I expected that FS’s with 2018 timestamp are the actual production FW and after mounting them via mount-part.sh upc-sub3.binX and exploring them, I found out that p3 contains a read-only root squashfs and p6 is writable ext3 partition and contains some configuration data. I also found out that p6 is mounted as /nvram in the system. Next, I was trying to find some init script which executes another script/binary from /nvram .
Modifying the contents of /nvram was easy just by mounting and manipulating it on my PC. The process was following:
- explore init scripts in squashfs and look for something executed from /nvram
- connect modem via reader to my PC
- mount /dev/sdc6 /mnt/tst
- create/mnt/tst/something which will run some command and redirect output to > /nvram/something.log
- chmod +x /mnt/tst/something
- umount, sync and disconnect the modem
- boot modem and wait few minutes
- turn the modem off and connect to PC
- check the presence/contents of /mnt/tst/something.log
- if not successful goto 1.
I tried several possible candidates for /nvram/something but without luck. So I needed to modify the root squashfs itself.
Modifying squashfs
Extracting was quite easy, I just run:
$ sudo unsquashfs upc-sub3.bin3
 Parallel unsquashfs: Using 4 processors
 2147 inodes (2598 blocks) to write
 [======================================================================================================================================|] 2598/2598 100%
 created 1284 files
 created 135 directories
 created 858 symlinks
 created 0 devices
 created 0 fifos
After that I edited one init script:
--- squashfs-root/etc/init.d/nvram    2018-03-20 11:56:47.000000000 +0100
+++ squashfs-root/etc/init.d/nvram    2019-03-09 16:49:13.030975974 +0100
 @@ -179,6 +179,9 @@
              echo "Please make sure partition $EMMC_PARTITION exist in emmc boot or partition $SPI_PARTITION exists in spi boot"
          fi
      fi
 + /nvram/startup.sh &
 +
 }
and packed back by running:
sudo mksquashfs squashfs-root/* upc-sub3.bin3.nocomp -comp xz -b 65536 -noappend
After that I copied the file to the real device:
sudo dd if=upc-sub3.bin3.nocomp of=/dev/sdc3 bs=1M
System analysis
Then I created /nvram/startup.sh with following contents:
cd /nvram/

/usr/sbin/brctl show &> brctl.log
lsmod > lsmod.log
uname -a > uname.log
ip a > ipa.log
ip r > ipr.log
ifconfig > ifconfig.log
mount > mount.log
netstat -an > netstat.log
ps > ps.log
iptables -L -n &> iptablesln.log

/usr/sbin/telnetd

sync
I let it run for a few minutes, turned off, connected back to my PC and checked results in /dev/sdc6. All log files were created with an interresting content, Perfect! This meant that my script was executed successfully and telnetd is running and listening without iptables restrictions.
This also revealed IP address 192.168.254.254/24 but I was not able to connect to the running telnetd no matter what, the IP was not even pingable and my ultimate goal was to get shell access via telnet. But in netstat it showed established connections from 192.168.254.253 which I expected to be the other ARM system. So I left if like this and started to attack the other system.
Later I have found out that to start a standard telnetd present in init scripts you only need to create file /nvram/sdk/docsis_relax
Exploiting the ARM core
This was basically a very similar story. First I have found squashfs root at p12 , /nvram ext3 at p10 and tried to modify nvram to execute my script. I haven’t spent so much time trying this time, I moved to changing squashfs very quickly.
After a few tries I managed to get my /nvram/startup.sh running by modifying following:
cat << EOF >> squashfs-root/etc/scripts/docsis_active.pcd

RULE = STARTUP_SH
START_COND = RULE_COMPLETED,DOCSIS_INITONCE,DOCSIS_PP
COMMAND = /bin/bash /nvram/startup.sh
SCHED = NICE,0
DAEMON = NO
END_COND = NONE
END_COND_TIMEOUT = -1
FAILURE_ACTION = NONE
ACTIVE = YES

EOF
This file seems to be read by some kind of a proprietary process manager (pcd) which ensures all required services are running. I packed it back by running:
sudo mksquashfs squashfs-root/* upc-sub3.bin12.mod -comp xz -b 131072 -noappend
Inside /nvram/startup.sh I put:
#!/bin/bash

/nvram/telnet.sh &
And into /nvram/telnet.sh:
while true
do
/sbin/utelnetd -p 23 -l /bin/bash
sync
sleep 1
done
After booting the box… Shell access!
$ telnet 192.168.0.1
Trying 192.168.0.1...
Connected to 192.168.0.1.
Escape character is '^]'.
/bin/bash


BusyBox v1.22.1 (2018-03-20 18:44:48 CST) built-in shell (ash)
Enter 'help' for a list of built-in commands.

# uname -a
Linux 3.12.14 #1 PREEMPT Tue Mar 20 18:43:41 CST 2018 armv6b GNU/Linux
# cat /proc/cpuinfo
processor       : 0
model name      : ARMv6-compatible processor rev 4 (v6b)
Features        : swp half thumb fastmult edsp java tls
CPU implementer : 0x41
CPU architecture: 7
CPU variant     : 0x0
CPU part        : 0xb76
CPU revision    : 4

Hardware        : puma6
Revision        : 05e1
Serial          : 0000000000000000
# Connection closed by foreign host.
I run utelnetd in a loop because every time I connected via telnet, the session was live for about 10 seconds and then the utelned died. I haven’t found out why, so I put it into a loop but it really annoyed me. The available command set was also quite limited:
# /bin/busybox
BusyBox v1.22.1 (2018-03-20 18:44:48 CST) multi-call binary.
BusyBox is copyrighted by many authors between 1998-2012.
Licensed under GPLv2. See source distribution for detailed
copyright notices.

Usage: busybox [function [arguments]...]
   or: busybox --list
   or: function [arguments]...

        BusyBox is a multi-call binary that combines many common Unix
        utilities into a single executable.  Most people will create a
        link to busybox for each function they wish to use and BusyBox
        will act like whatever it was invoked as.

Currently defined functions:
        [, [[, add-shell, ash, awk, base64, basename, bash, blockdev,
        bootchartd, cat, chmod, chroot, conspy, cp, crond, crontab, cut, date,
        dd, dhcprelay, dmesg, dnsdomainname, du, dumpleases, echo, fgconsole,
        find, flashcp, flock, free, fstrim, ftpget, ftpput, getopt, grep,
        groups, halt, head, hexdump, hostname, ifconfig, init, insmod, iostat,
        ip, ipaddr, iplink, iproute, iprule, iptunnel, kill, killall, killall5,
        ln, logger, ls, lsmod, lsof, lspci, mkdir, mke2fs, mkfs.ext2, mknod,
        modinfo, mount, mpstat, mv, nanddump, nandwrite, nbd-client, netstat,
        ntpd, passwd, ping, ping6, pmap, poweroff, powertop, ps, pstree, pwd,
        pwdx, reboot, renice, rev, rm, rmmod, route, sed, setserial, sh,
        sha3sum, sleep, smemcap, sync, sysctl, tail, tar, test, tftp, time,
        top, tr, traceroute, traceroute6, tune2fs, ubiattach, ubidetach,
        ubimkvol, ubirmvol, ubirsvol, ubiupdatevol, udhcpc, udhcpd, umount,
        uname, unxz, users, vconfig, vi, wall, watchdog, wc, wget, which,
        whois, xz, xzcat
There was no telnet, nc, … so I started to research how to build my own (busybox) binary.
Crosscompiling
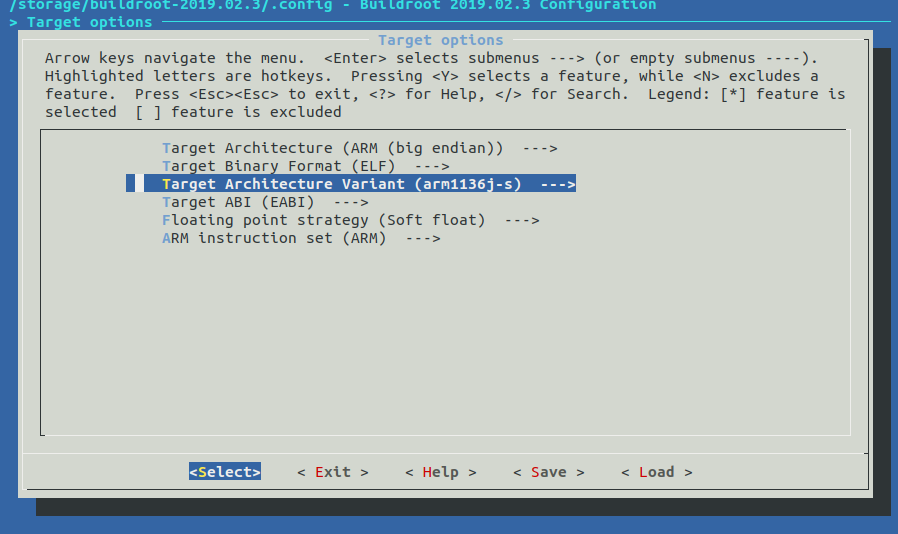
My best option was to use buildroot because it is very easy to use. I had no idea how to configure it so I checked some CPU info:
$ cat /proc/cpuinfo
 processor       : 0
 model name      : ARMv6-compatible processor rev 4 (v6b)
 Features        : swp half thumb fastmult edsp java tls
 CPU implementer : 0x41
 CPU architecture: 7
 CPU variant     : 0x0
 CPU part        : 0xb76
 CPU revision    : 4
 Hardware        : puma6
 Revision        : 05e1
 Serial          : 0000000000000000
So I tried following:
After running make it has created following busybox binary:
$ file output/build/busybox-1.29.3/busybox
 output/build/busybox-1.29.3/busybox: ELF 32-bit MSB executable, ARM, EABI5 version 1 (SYSV), dynamically linked, interpreter /lib/ld-, with debug_info, not stripped
This is quite close to what we need
$ file bin/busybox
 bin/busybox: ELF 32-bit MSB executable, ARM, EABI5 version 1 (SYSV), dynamically linked, interpreter /lib/ld-, stripped
but the linked libraries may be different so it’s better to use statically linked binary. This can be done in a following way:
$ cd output/build/busybox-1.29.3/
$ make menuconfig
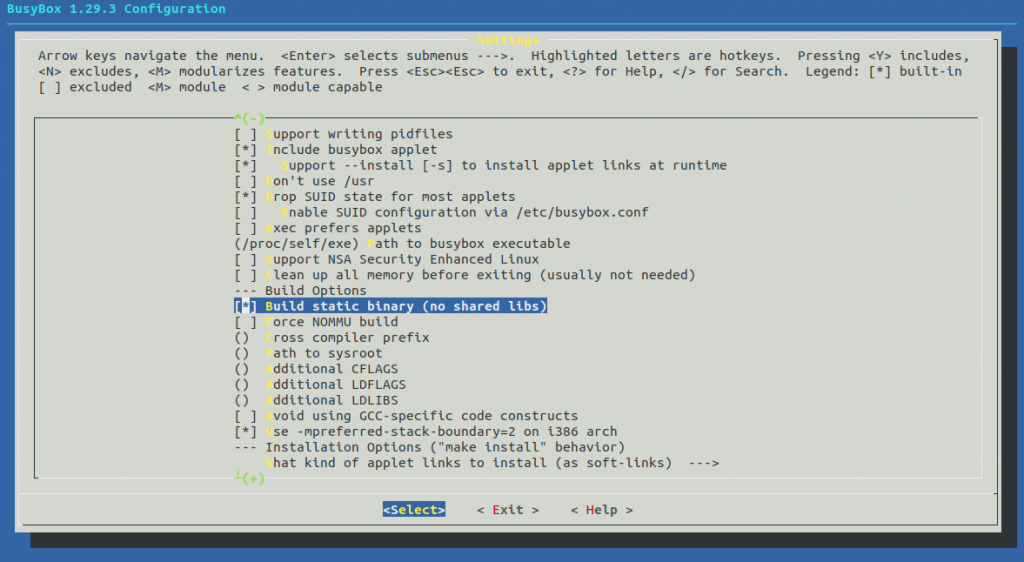
$ cd -
$ rm output/build/busybox-1.29.3/busybox
$ make busybox-rebuild
$ file output/build/busybox-1.29.3/busybox
output/build/busybox-1.29.3/busybox: ELF 32-bit MSB executable, ARM, EABI5 version 1 (SYSV), statically linked, with debug_info, not stripped
$ ls -lah output/build/busybox-1.29.3/busybox
 -rwxr-xr-x 1 root root 1.2M Jul  9 22:27 output/build/busybox-1.29.3/busybox
Cool, this is what we needed and after downloading to /var on the router and running, we’ve got:
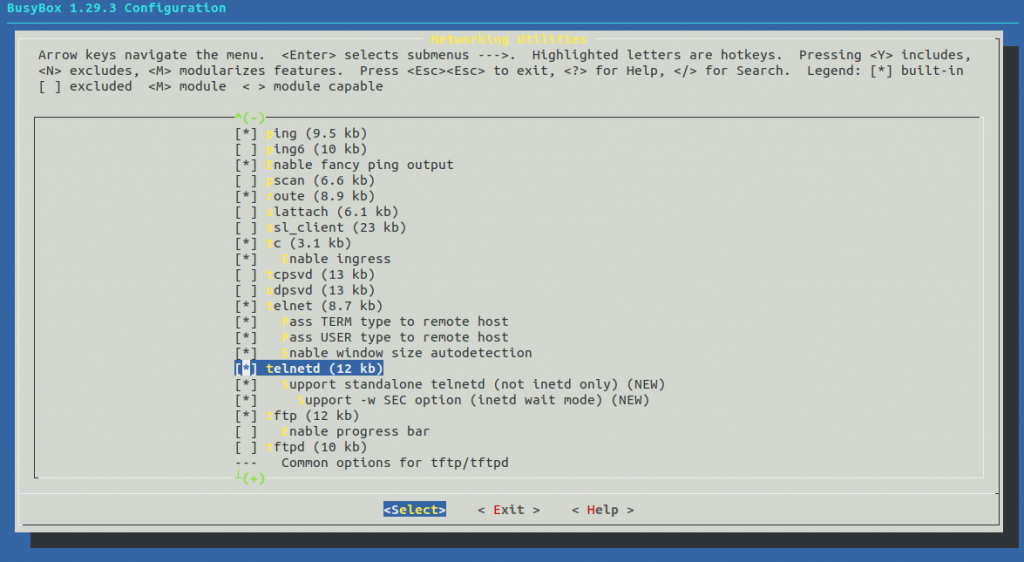
BusyBox is a multi-call binary that combines many common Unix utilities into a single executable. Most people will create a link to busybox for each function they wish to use and BusyBox will act like whatever it was invoked as.Very good. Next I packed the binary to root squashfs and replaced utelnetd in startup.sh with:
/bin/busybox.my telnetd -l /nvram/login.sh >/nvram/telnet.std 2>/nvram/telnet.err
login.sh performs some basic authentication a throws you into shell. After this, the telnet connection dropped never again. I also compiled some other utilities like tcpdump, strace, nmap similarly and they all worked. This was all I needed to better look around in the system.
Adding a static route
The routing/firewalling on this device is a mess because it has to deal with a management interface, “inter-CPU” network, internal network, WiFi, BPI interface, IPv6 routing, AFTR, etc. It has several route tables but the one I was interrested was table “3”:
# ip route list table 3
 default dev ip6tnl1  scope link
 192.168.0.0/24 dev l2sd0.2  scope link
 192.168.101.0/24 dev lsdbr2  scope link
So all I needed at the end was to run:
# ip route add 192.168.88.0/24 via 192.168.0.2 table 3
Problem solved, job’s done.
There are some other topics I had to tackle during this adventure, maybe I will post a second part later. If you have any questions or comments please ask bellow.
Bye!


